The Misconception About Roof Penetrations
Like the old saying “it’s not the fall that hurts, it’s the sudden stop at the bottom”, it can be said that it’s not the roof penetration that hurts, it’s the painful leak that results. It is understandable that people hate roof penetrations and try to avoid them at all cost. A commercial roofing system is expensive and the thought of poking holes in it sends shivers down one’s spine. But instead of simply avoiding roof penetrations altogether, consider that if done properly, those painful leaks can be eliminated and rooftop equipment can be mounted securely. In fact, roofs are full of penetrations. Skylights, A/C units, air vents, and plumbing vents, to name a few, all involve roof penetrations. However, those instances aren’t usually problems because they are typically roofed in during new construction or renovation when properly designed by an architect or roof consultant, and installed by a qualified roofing contractor.
Leak problems occur when non-qualified contractors penetrate the roof with improperly designed attachments.
It is rare for a roofing system originally installed during construction or renovation to leak, assuming a reputable roofing contractor did the work. It is work that takes place after the roofers are gone that can create some real problems. An electrician runs a conduit through the roof, an HVAC contractor adds a small AC unit, an equipment screen gets installed; these are all common events with high potential for poor workmanship and resultant leaks.
Improper penetrations by contractors unskilled in roofing have happened so many times in the past, the words roof penetration have become synonymous with roof leaks.
Bad Ideas People Use to Avoid Roof Penetrations
With this widespread perception that roof penetrations will cause leaks, people have resorted to solutions that seem to solve the problem, but can actually cause more harm to the roof. To make matters worse, these solutions can also pose significant safety risks.
The most common solution is to let equipment sit on the roof held down by its own weight, or add ballast like concrete blocks to hold it down. It is obvious for objects like equipment screen walls, signs and large HVAC units to be mechanically attached to the roof structure, but it is also very common for smaller equipment and other roof accessories to be placed directly on the roof, or to be held down with ballast.
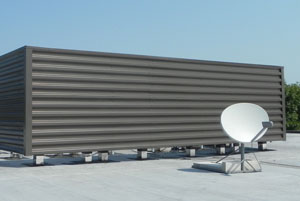
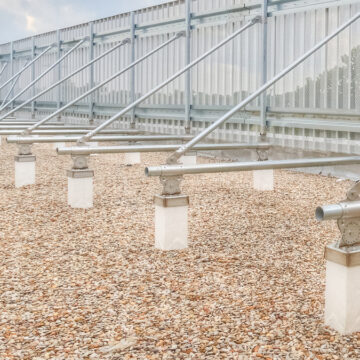
A satellite dish is mounted using concrete blocks as ballast. The blocks are retained by a metal tray which sits directly on the roof membrane, leading to premature failure. Ironically, in the background is a beautiful RoofScreen with properly installed and roofed attachments.
Wind is a powerful force and anything with surface area acts as a sail. Not only could equipment completely tip over or even blow off the roof, there are other less obvious problems that occur. Constant movement from wind and thermal expansion will grind and wear on the roof under the equipment. If it is heavy ballast, indentations can also form. Water, dirt and gravel can collect in the indentations, further contributing to roof wear and premature failure. Another major concern is weight. Many roofs are designed for minimal loading and adding heavy ballast blocks can overload the structure quickly. An unexpected heavy rain or snow, or a simple clogged drain on an overloaded roof can result in major disaster.
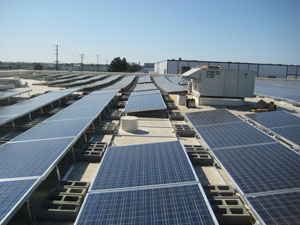
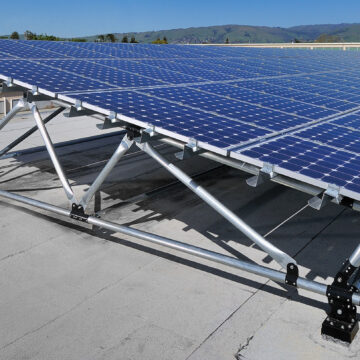
This is an example of a ballasted solar array on a large flat roof. Concrete blocks press the metal racking trays directly against the roof membrane. Not only is this a bad idea for the roofing system, the big red flag here is weight. In a heavy rain the water cannot flow to the drains as designed, putting this roof in serious risk of collapse.
When adding any type of equipment to a rooftop, primary concerns are safety, waterproofing and preserving the service life of the roofing. Using an inferior method of mounting equipment to avoid roof penetrations may solve the waterproofing concern, at least for the short term. However, adding heavy ballast, restricting water flow or leaving unattached equipment exposed to wind forces can seriously compromise building safety. True, these methods won’t cause immediate leaks, but that is shortsighted. Restricted water flow and roof wear from ballast will shorten the service life of the roof.
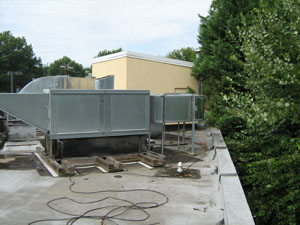
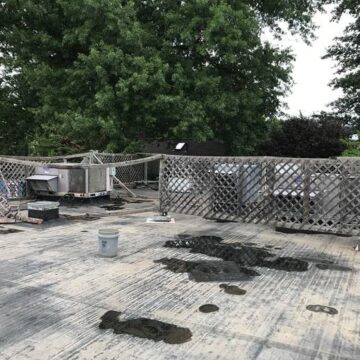
This HVAC equipment, including some large elevated ductwork sits under its own weight on redwood sleepers. Water is restricted from flowing to the drains which causes ponding and a buildup of mud and debris.
Roof Penetrations Are a Good Thing if You Follow These Two Rules
Anything installed on a commercial roof that is subject to wind and seismic loading should penetrate the roof and mechanically attach to the roof structure. But don’t think of it as something you have to do, think of it as something you want to do in the same way that you want the roofing to last a long time and keep occupants dry and safe.
Rule #1: Have a qualified licensed roofing contractor do the roofing portion of the work.
Don’t make the mistake of leaving the roofing up to an installing contractor without proper roofing skills and license. If the roof is under warranty, the contractor may need to be certified by the roof material manufacturer. Before any work takes place, all proposed roof penetration details should be submitted to the manufacturer for approval. But roofers are not miracle workers. You have to give them something good to work with, which leads us to the second rule.
Rule #2: Properly design the roof attachment.
Any roof penetration needs to be roofed and sealed by a qualified, licensed roofing contractor. But to ensure a roof penetration doesn’t leak, it needs to start way before the roofing contractor steps foot on the roof. Items penetrating the roof must be properly designed so they can be roofed in using industry standard best practices. Don’t expect that if a contractor penetrates the roof with a wood beam or perforated Unistrut channel, that the roofer can properly seal it for long term service. Coordination between the installing contractor and roofing contractor, combined with properly designed roof attachments, can result in completely water tight roof penetrations that require no maintenance.
The Basics of Proper Roof Attachment Design
Designing a proper roof attachment requires expertise in roofing and waterproofing, as well as knowledge about roofing systems and assemblies. Roofing consultants and architects are typically the experts who do this work. This article touches on some very basic concepts and methods. Sketches shown are only for illustration purposes only and not intended to represent actual roofing details. For more in-depth information on proper roof attachment design, a very good resource is the National Roofing Contractors Association (www.nrca.net).
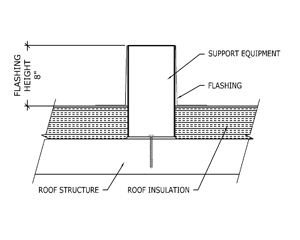
One of the most basic design elements to be considered for effective roof attachment is flashing height. Industry standard is that the flashing around a penetration should extend a minimum of 8” above the roof surface. This reduces the likelihood of ice, snow and splashing water to infiltrate through the top of the flashing. However, less than 8” may be acceptable to roof system manufacturers and stay within warranty requirements if the penetration is sealed at the top. Such details should be submitted to the manufacturer’s technical department for approval before installation.
Methods used to make penetrations watertight fall into 3 basic categories: counter-flashed, caulked and banded, and pitch pockets. Below is a brief overview of each.
Counter-flashing
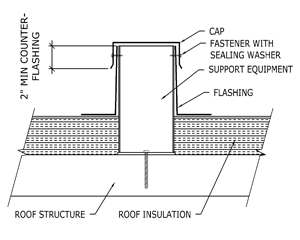
The preferred method to seal a roof penetration is to use a counter-flashing to extend over the outside of the base flashing. The base flashing is installed around the object being sealed and its base flange is roofed into the roofing system. A counter-flashing, typically in the shape of a cap, or upside-down pan, is installed over the base flashing and extends down 2” or more, shedding water to the outside and onto the roofing. Counter-flashing caps are typically secured by screws with neoprene washers installed through the side legs of the cap as shown in Figure 2. Skylights and roof curbs are typically installed in this manner.
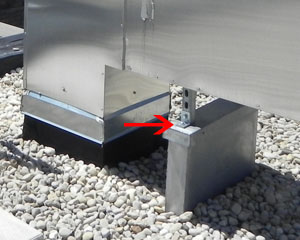
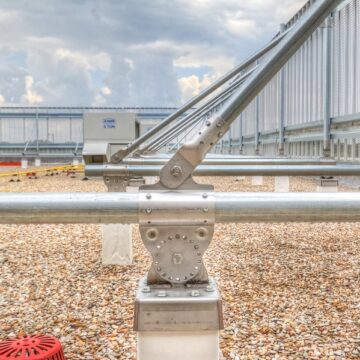
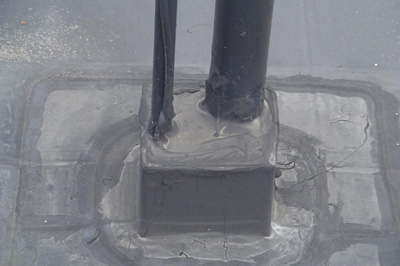
In this example, a well-designed steel sleeper curb is compromised by an unsealed bolt penetrating the top of the waterproof sheet metal cap.
Puncturing the top of the cap provides a direct path for water infiltration. Any equipment attached to the top of the cap must be carefully sealed and waterproofed. Relying on caulking for this waterproofing is the least effective method as it requires constant maintenance to keep it watertight. Unfortunately this is a very common mistake. A well designed roof support with a sealed cap can be installed on a roof and be completely watertight when that contractor leaves the roof. Another contractor then adds equipment to the support and fastens it down with screws or lag bolts, penetrating the top of the cap. Typically, a dab of caulking on top of the bolt is the extent of waterproofing done by the second contractor.
Ideally a mechanically compressed gasket or washer will be used if penetrating the top of the cap. The gasket or washer should be completely protected from UV exposure to prevent it from degrading.
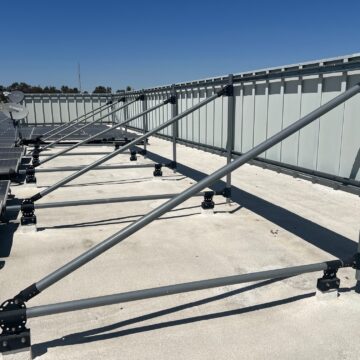
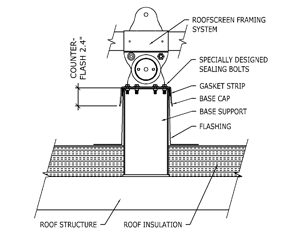
RoofScreen Mfg. has proven out the effectiveness of the counter-flashed approach. Our standard roof attachment system, shown below, employs a heavy steel cap which counter-flashes over the base flashing 2.4” and includes neoprene gasket between the cap and flashing for added protection. We do attach the cap through the top, but we do so with specially designed sealing bolts. These bolts are specially machined with an undercut shoulder. This allows the washer to compress approximately 50% when the bolt head is seated against the Base Cap surface. Since the washer is completely contained within the undercut, and the outside edges of the bolt head are in contact with Base Cap, the washer cannot be over compressed and is never exposed to the environment or UV light. RoofScreen Mfg. has successfully deployed over 150,000 such attachments throughout the United States without a single reported leak.
Caulk and Band
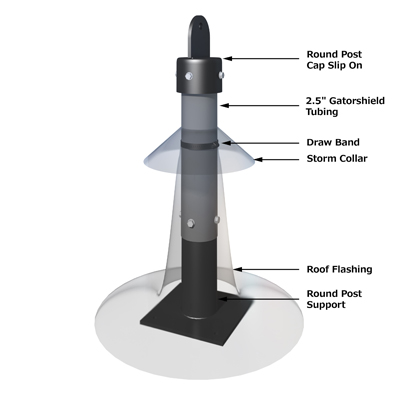
This method is slightly less desirable because it requires periodic maintenance, but still accepted as good roofing practice if done correctly as shown in the RoofScreen Mfg. example above. Caulked and banded flashings are typically used on round penetrations such as pipes and structural tubes, especially when the pipe or tube extends up beyond a reasonable flashing height. The base flashing is installed around the pipe, typically 8” tall, and is clamped tightly with a draw band (common hose clamp). Caulking is applied around the top of the flashing above the clamp. A secondary flashing made of metal or neoprene rubber, commonly called storm collar, should be installed above the band and caulking to help shed water to the outside and protect the caulking from weather and UV light.
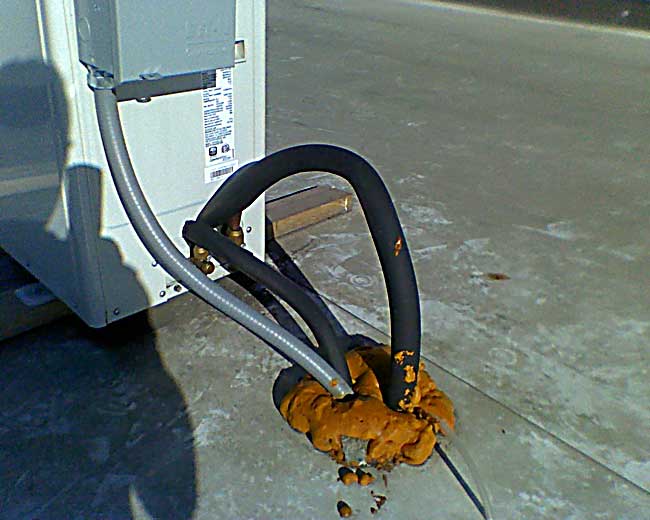
This is an example of a poorly installed and neglected roof penetration using the caulk and band method. A rubber storm collar would have greatly increase the life and water tightness of this detail.

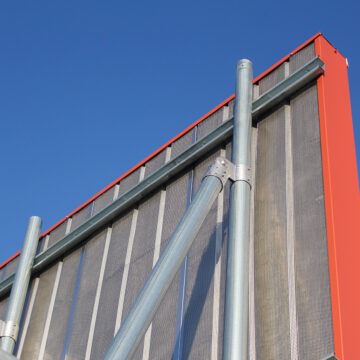
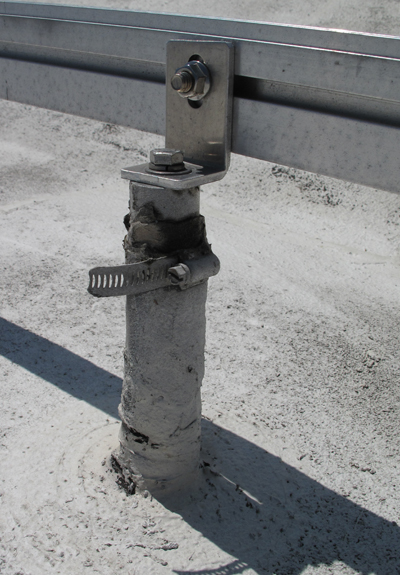
The caulk and band method of sealing a flashing does not work well on shapes that are not round such as the one in the image to the right. To be effective, the band must create pressure around the entire flashing to keep it sealed. Using a draw band on a square steel post, for example, will be very tight on the corners, but on the flat sides of the post the flashing will not be tightly clamped. This results in 100% reliance on the caulking to keep water out, requiring biannual maintenance.
There are effective ways to seal square and odd shaped protrusions. Such techniques are involved and beyond the scope of this article. For more information it is recommended to consult with a reputable roofing contractor or consultant.
Pitch Pocket
This method should be considered last resort for sealing difficult objects when other more effective methods won’t work. A pitch pocket, typically fabricated out of sheet metal, is a flanged sleeve flashed into the roofing system creating a dam to retain sealant which is poured into the pitch pocket. The sealant material flows around the object creating a seal. Many years ago the common material for this was coal tar pitch, thus the name pitch pocket or pitch pan. Modern roofing practices employ various types of chemical sealants in pitch pockets, and often include grout fillers with the sealant poured in as a top layer.
While pitch pockets can be effective for odd shaped objects, and when multiple objects penetrate through the same opening, the disadvantage is they require maintenance. All sealants eventually break down, harden, crack and pull away from the object being sealed. Adding a cover, like a neoprene or lead umbrella, over the pitch pan to protect it from weather and UV light can help extend its life significantly.
Conclusion
If you had to pick one element of a building to function flawlessly, wouldn’t it be the roof? Buildings protect us from weather and keep us warm, dry and safe. Without a roof, none of those are possible. So any roof work deserves proper due diligence and attention to detail to ensure that its integrity is not compromised. Nobody wants leaks. Collateral damage, business disruption, liability, lawsuits and reputations are at stake. And it’s not just obvious dripping leaks that cause problems. In fact it could be argued that undetected leaks can be more damaging. Dry rot repairs are expensive. Effects of mold on people and abatement costs can be catastrophic.
It may seem counter-intuitive to say that roof penetrations are actually a good thing. But in almost all cases, properly designed and installed roof penetrations are exactly what you want. So next time you need to add equipment to a commercial roof, consult the experts, find a qualified roofing contractor, use properly designed attachment materials, and sleep better at night.